 button on the Windows Title Bar.
The Debtor History Tab provides a listing of history for the account including all claims and debtors.
You may choose to expand or contract any of the Blue titles sections of the program for a more complete view of the data. Take your cursor and hover over the edges of the section or column header to display the splitter bar icon and hold down your left mouse button dragging the splitter to the desired location. This change will remain in effect until you exit CollectMax.
Additionally, CollectMax can be expanded to full screen by clicking the button on the Windows Title Bar.


The Account section lists the CollectMax Account Number assigned to this account when it was added. To change the assigned account number, see How to Change the Debtor Account Number.

The Debtors section lists the debtor names and the number of debtors attached to this account. On some page tabs, the data on the screen will be specific to the debtor who is selected. Additionally, the selected debtor may have an affect on requested documents.
The display shows up to 2 debtors at a time. Click the scroll buttons on the right to display additional debtors. To add a debtor to an account, see How to Add Additional Debtors to an Account. To remove a debtor from the account, see How to Delete a Debtor from an Account.
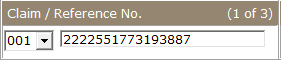
The Claim/Reference section lists the claim and reference number of the account you are viewing and the number of claims attached to this account. The reference number is typically the account number given by the original creditor of this account. To view another claim, click the  button and select another claim.

On some page tabs, the data on the screen will be specific to the claim that is selected at the time. Additionally, the selected claim may have an affect on the requested documents.

The Client section lists the
Client to which this account has been assigned. The Client can be either a Creditor or a Forwarder. The Client is typically who owns the debtor currently or the Forwarder who send the debtor for collections. For additional information about the assigned client, click the  button next to Client.
To change the Client attached to this account, see Client ID Reassignment.

The Status section lists the current status of the selected claim and the date it was changed to this status. Status codes should show you at a glance where the in the collections process a particular claim is.
To
change the status, click the  button and select the status
and click the
button and select the status
and click the  button. To add a new status code, click the
  button and see add
new status codes. To update the status on all accounts at one time or to back date the status change date, see Modify the Status.
button and see add
new status codes. To update the status on all accounts at one time or to back date the status change date, see Modify the Status.

The Link section lists the number other accounts linked to this account and allows you to access them. Linking allows users to link other like accounts using a single like number. Click the button
to view all other accounts. For more information on Account Linking, see
How to Link Accounts.
For automatic debtor linking, see Social Security Linking.

The Plaintiff section lists the
plaintiff attached to this account. Accounts may not have a plaintiff attached. Typically plaintiffs are assigned to accounts whose Client is a Forwarder. For more information on the plaintiff, click the button. To add a plaintiff to an account, see How to Attach an Account Member to a Debtor's Account.
This selection lists all notes added to the account including manual notes, network notes, and history of changes notes for all claims and debtors. This section defaults to All history entries on this account which includes all claims and debtors.

Information on a particular history entry is listed in the following columns:
To move through the history, use the History Scroll Buttons.
The history will set to display all the detail on each history note. To condense the history, click the
 box next to the
  field.
Each history
entry is displayed in chronological order of entry. To
change the display to effective date order, click the box
next to the field.
CollectMax
allows
users to narrow the view of the account history entries by clicking the
and selecting from the Display
For list.

 button.
The ALL selection can be filtered down to specific types of notes. Click the button to display the History Filter Selection Screen.
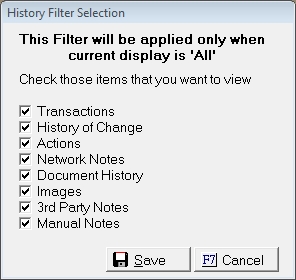
Click the box next the History types you to would like to see when Displaying For All. For Example, if selected only Transactions, then when displaying for ALL only transactions for all Claims will be displayed. Click the  button to set the History Filter. This setting will remain set until the next login session of CollectMax.
You can also search the history for keywords.

Enter the keyword or words and click the  button. To go back to a view of the complete history, click the
 ![]() button.
button.
 : Click the Activity Entry Button to add an Activity Code.
 : Click
the new button to add a new manual history
entry.
: Click
the new button to add a new manual history
entry.
 : Click
the modify button to change the selected history entry. Not all history entries will be available to be modified. The word Modify will appear grayed out when the modifying option is not available.
: Click
the modify button to change the selected history entry. Not all history entries will be available to be modified. The word Modify will appear grayed out when the modifying option is not available.
 : Click
the delete button to delete the selected history entry.
: Click
the delete button to delete the selected history entry.
 : Click
the print button to print the current history view on a report. Users
can select to print to screen, file or printer.
: Click
the print button to print the current history view on a report. Users
can select to print to screen, file or printer.
 : Available on Network Accounts to Remark for Upload the selected note. Remarking a note does not guarantee a note will be uploaded. Only notes allowed to be uploaded can be reuploaded via remark.
 : Available on Network Accounts only to add network note codes for upload to your forwarder.